We are closing.

 Documentation
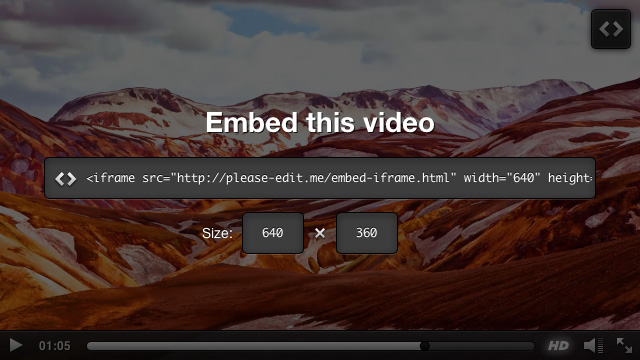
The Auto Embed and Manual Embed add-ons allow your audience to easily share your videos by embedding them into their own sites or elsewhere on the web. Both add-ons will display an embed button on the top-right corner of the player which opens a pane showing the actual embed code and the possibility to change the embedded player size.

The main embed button in our Classic player.

The embed pane.
The Auto Embed add-on is the easiest way to enable embedding for your videos. With this add-on you don’t need to create an HTML page for every video you want to be embeddable: the add-on takes care of generating those files for you and automatically keeping them in sync with the original <video> elements you’ve placed on your site.
To enable this feature by default for you player(s), activate it via your site’s Player editor page on MySublimeVideo. You can also only use this feature on a per-video basis via the Video Publishing Assistant.
Important notes:
If you don’t use the Auto Embed add-on, you will have to follow the 2 steps below to enable embedding for your videos:
You need to create an HTML page for every video you would like to make available for embedding. You need to host this page on one of the domains you have registered on MySublimeVideo.
The final snippet of code that your audience will copy from the embed pane and share is an <iframe> element pointing to that HTML page.
<!DOCTYPE html>
<html>
<head>
  <title></title>
  <script type="text/javascript" src="//cdn.sublimevideo.net/js/YOUR_TOKEN.js"></script>
</head>
<body>
  <video style="display:none" class="sublime" poster="poster.jpg" preload="none">
    <source src="video.mp4" />
    <source src="video.webm" />
  </video>
</body>
Important note:
<video> element with the code generated by the Video Publishing Assistant but change the following two things:width and height attributes, the player will automatically fill the entire iframe.style="display:none". It’s optional but we recommend it to prevent UI flickering when the iframe is initially loaded.Host this file on a domain that is registered on MySublimeVideo. For instance, if your registered domain is yourdomain.com, you could save this page at http://yourdomain.com/embeds/video1.html.
Like most of our add-ons, you can set up its default options that should apply to all of your videos from your site’s Player editor page on MySublimeVideo. But you can also set more options and override the default ones on a per video basis via the Video Publishing Assistant, or manually, using the data-settings attribute directly on the <video> elements.
Please note the settings described below can be set via the Video Publishing Assistant and via your site’s Player editor page on MySublimeVideo.
The table below gives you an overview of all the embed settings available and from where you can actually set them up.
| Embed setting | Player editor | Video Publishing Assistant | Notes |
|---|---|---|---|
| Enable/Disable the embed button | * | ||
| Enable/Disable the auto embedding feature | |||
| Embed URL | The URL of the HTML page you created in step 1 of Manual embedding. | ||
| Default embed size |
*: When manual embedding is enabled, you still need to provide a valid embed URL in order for the embed button to show up in the player.
embed-enableAllows you to enable or disable the embed button and pane feature. Please note that unless you’re using the auto embedding feature, an embed URL must be provided in any case, otherwise the embed button won’t appear (see embed-url).
Allowed values:
true – (Default) Enable embed button and pane feature.false – Disable the embed button and pane feature.Example:
<video class='sublime' data-embed-enable='false'>
  ...
</video>embed-typeDefines the type of embedding you want to use: manual or auto. If you set the type to “auto”, you must set a unique ID for your videos.
Allowed values:
manual – (Default) Use the manual embedding feature.auto – Use the auto embedding feature.Example:
<video class='sublime' data-embed-type='auto'>
  ...
</video>embed-urlDon’t set this setting if you’re using the auto embedding feature.
Defines the URL of the HTML page with the embeddable player (a.k.a the iframe content). This setting is required – the embed button will only appear if an URL is specified.
Allowed values:
any valid urlExample:
<video class='sublime' data-embed-url='http://yourdomain.com/embeds/video1.html'>
  ...
</video>embed-sizeDefines the default embed size. The user will be able to adjust this size directly from the embed pane. If no default embed size is specified, the player size will be used instead (and, if necessary, the height will be adjusted to respect the original aspect-ratio of the video).
Allowed values:
width x height – A string containing both width and height values separated by a ‘x’.width – In case you want the height of the embed to be dynamically computed (when the user clicks on the embed button to show the embed pane) to automatically match the video aspect-ratio.Example:
<video class='sublime' data-embed-size='640x360'>
  ...
</video>